Remember those 5 lilttle chicks that I got from the market? The little chicks are now reduced in number, from five reduced till only two in my care. Two got sick and died, one was eaten by the stray cat.... Pity, there are things that I do not know and now I just hope the other two will survive... Mr Man has turned 360, he loved them! And since now there's only two left, he played with them until they would follow him around...Amazing!
Sunday 30 September 2012
Saturday 22 September 2012
Free-Range Chicken...and what should I do with them?
 Yesterday, when i went to the Kulim Market, I bought 5 chicks on a whim....I did not plan ahead to buy them, and suddenly I realized when I got home I have 5 cute chicks with me.... (at this point of writing, they are 11 day old chicks, an 'ayam kampung' type) Wow....what was I thinking?
Mr Man (my hubby) was certainly not very pleased....He kept asking me, how am I going to raise them, where am I gonna put them and keep reminding me that those chicks 'are my responsibility'...I really did not know what to do as I have never raised chicken in my life!! Luckily, there was a really large clothes bucket that I can use as their temporary home..which I lined with old newspapers and placed them in the toilet, well, just to keep them safe from hungry predators like cats and lizard.
After that, last night I keep looking for a solution to my adopted chicken problem:
1) I can just give them away to people who have the time and love to keep them
2) I can also TRY to raise them myself, and maybe after 7 months or so I can have roast chicken on the table, yeah?
3) Raise them as an experiment and one day open a chicken farm? (that was my business sense talking)
......and what about the constant predators?
We constantly have stray cats lingering around in our garden. There is one large tom-cat which we nick-named Hitler (due to his black spot just below his nose that resembles his namesake)...Yesterday, he kept on patrolling our back kitchen, probably because he was getting a whiff of the chick's smell...
There are large and small lizards as well, which live in the drainage area near our house..We see them around but usually just leave them alone as they never cause any harm to us. But they could come to our house and eat those chicks now that we have them, yes?
The solution that I could think of is to build a coup. But, having chickens would attract flies (from the chicken manure)....Arghh, don't know what to do.... Do I have the time for them? Just incase that any of you have any idea or could share some insight or tips, please do pen me a line or two...thanks..

Saturday 28 July 2012
How to make 'KUIH CARA MANIS'
 |
| KUIH CARA MANIS |
This is a traditional Malay kueh, a sort-of pancake-y dessert (the difference is the mould that it uses instead of a pan), and is typically served during tea-time. In the Ramadan month, it is much sought after at the Ramadan Bazaar. The thing is, it is so easy to make...most of the ingredients are the basics that we all have in our kitchen (flour, salt, egg, sugar, oil/ghee) and garden...screwpine leaf (daun pandan), coconut milk (if you have the tree..if not just get a can/carton ones!!) Here's the fuss-free recipe, try it, and you'll see what i mean...hey, presto! Easy-peasy!
KUIH CARA MANIS
ingredients:
1 cup wheat flour
1/2 cup water
1/2 cup coconut milk
5 pandan (screwpine) leaf (5 to blend)
1 egg
salt
oil / ghee (to grease the baking mould)
granulated sugar
method:
1.) Using a blender, make a pandan juice using 1/2 cup water & pandan leaves. Strain and put the juice aside.
2.) In a bowl, mix the flour with the egg. Add the juice and coconut milk, and finally the salt (to taste).
3.) Heat the baking mould on the stove fire (either the cermai mould or any mould of your liking), brush them lightly with oil or clarified oil (ghee).
4.) Fill the each mould with half of the batter, and fill the centre with 1/4 teaspoon sugar. Pour some more batter until it reach the top of the mould. Cover the mould with a lid, preferrably an glass lid so that you could see what's happening inside. Wait for a a minute and check if the kueh is ready to be pick up.
5) How to know when the kueh is ready? Easy, use your fork and check the bottom of the kuih ~ if its brownish, and the top is already firm, its ready to be picked up. And start step 3-4 all over again.
THE BAKING MOULD PATTERN INFO:
*Just for your knowledge, the traditional baking mould are usually made with copper, which makes the cooking more faster and are heavier. It is usually passed on from mother to daughter, and I guess in this modern day it is more valuable because they just don't make the copper ones anymore. It is so hard to get and most people just display them as an antique furnishings and deco...hmmmm.
*The tin ones are available at most shops, and they are lighter. The modern girls are being cheated right....and I guess our daughters will only remember the tin ones as part of their childhood memories right...?
So sad....
 |
| Modern day tin mould. In the front is 'cermai' pattern mould, and at the back is the 'belimbing' pattern mould. |
 |
| A sample of copper 'cermai pattern' mould |
 |
| Kuih cara in a mould |
 |
| A 'belimbing' pattern kuih cara |
 |
| A 'cermai' pattern kuih cara |
Sunday 15 July 2012
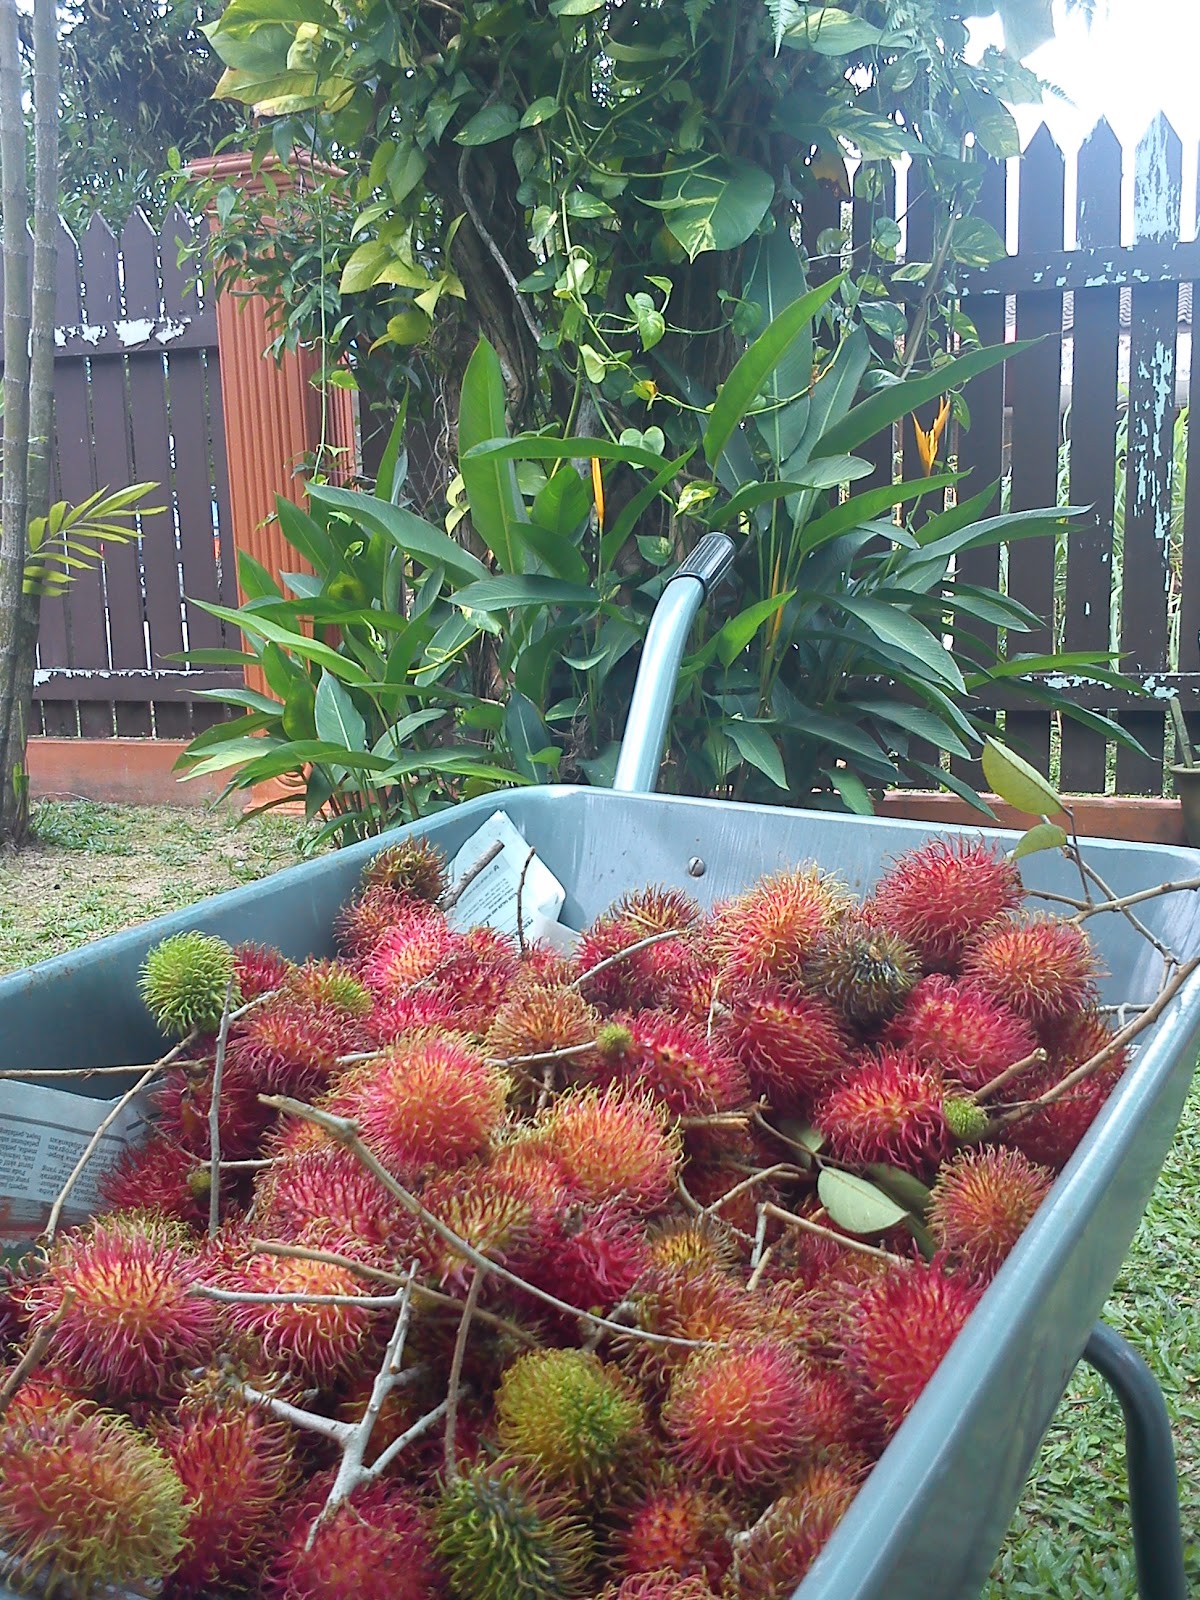
of Gula Batu Rambutans & solitary mangosteen...
We are going to KL today to take my mother in law visit her daughter there. Yesterday we cleared the rambutan tree from its sea of red, ripe rambutans. The reason for this is because nobody will be here to eat them...so we took down every single fruit, bunched them up in tiny bundles and plastic bags and gave them to our neighbours. Otherwise, if we do not do that, we will end up with rotten fruits scattered on the yard when we were away. So I guess, we get to do some charity (sedekah) and at the same time making sure our yard will be clean when we get back from KL..oh, the genius behind this is mama...she always thinks ahead..
of GULA BATU RAMBUTAN....


This year her rambutan tree is doing well. The breed of this rambutan is called 'Gula Batu' (Rock Sugar) because it is so sweet, and the flesh does not stick to the seed. She planted two varieties of the Gula Batu Rambutan ~ the small sized and the big sized type. This year, it is the big sized type that is doing so well and bear huge amount of fruit. The small size type is still developing its fruit, perhaps it is still a young tree, and so the fruit is a bit late in blooming.
of SOLITARY MANGOSTEEN....
Unlike her rambutan tree, the mangosteen is not doing so well this year. Yesterday, I only got a single peace of mangosteen...well, one is better than nothing , right? ;)
of GULA BATU RAMBUTAN....

This year her rambutan tree is doing well. The breed of this rambutan is called 'Gula Batu' (Rock Sugar) because it is so sweet, and the flesh does not stick to the seed. She planted two varieties of the Gula Batu Rambutan ~ the small sized and the big sized type. This year, it is the big sized type that is doing so well and bear huge amount of fruit. The small size type is still developing its fruit, perhaps it is still a young tree, and so the fruit is a bit late in blooming.
of SOLITARY MANGOSTEEN....
Unlike her rambutan tree, the mangosteen is not doing so well this year. Yesterday, I only got a single peace of mangosteen...well, one is better than nothing , right? ;)
Friday 13 July 2012
A trip to the nursery
.jpg) |
| The wangi malam & in the background is the frangipani flower. |
Monday 9 July 2012
Pennywort Leaves (Daun pegaga)

My hubby & I arrived back in my hubby's hometown, Kulim, Kedah, almost a month late than our original plan. The garden that I left in my mother in-law's care seem to be making slow progress. Sadly, my watermelon & pennywort (pegaga leaf) didn't survived the snail attack (they seemed to like these two the best). The pennywort leaf had actually been planted on the vegetable bed and under the cool shade they seemed to be doing okay. However, I guess the slugs have been going at them while we were away and now we are left with the stalks and the roots only. I have replanted them (the roots) and this time I chose to place them in my mother in-law's antique flower pot and hope they will have a good chance to survive. I guess I'll have to look out for those slugs and keep them away with some salt, perhaps some egg shells to keep them away. Anyhow, for those who are interested to plant the pennywort leaves (cantella asiatica) or its common name in Malay 'Daun Pegaga' in a container here's how:
1) Find your ideal pennywort in the night market or wet market. Buy only the feshest bunch, and when you get home, place them in a jar of water to keep them fresh while you prepare for the next step.
2)What you need is a no-hole flower pot, or if you don't have them, a normal flower pot with a saucer underneath them. The pennywort loves water and they would grow best in a wet medium. So it is better to have a pot without a hole so that the water will always be sustained in the soil.
3) Fill the pot with soil of your choice ~ black soil/ mixed mixture/ clay-ish soil/Lempung (indonesian)...fill until 3/4 full.
4) Plant the pennywort bunch in the soil and fill the pot with water, and let the water rise above the soil level. Place the pot on your window sill, balcony or any shady area...as long as there are enough sun light for its green leaves....
5) Just remember to keep the water level above the soil to keep your plant happy!
What is it good for?
Here are some quotations on its medicinal values & health values:
"Medicinally, pennywort has a considerable reputation as a tonic. It is considered a blood purifier and good for eyes, nervous conditions, memory and arthritis. It is reported with some medical support that a paste is helpful in healing wounds and reducing scaring. It is also often applied as a facial for a more youthful appearance." ~www.clovegarden.com
"Richard Lucas claimed in a book published in 1966[8](second edition in 1979) that a subspecies "Hydrocotyle asiatica minor" allegedly from Sri Lanka also called fo ti tieng, contained a longevity factor called 'youth Vitamin X' said to be 'a tonic for the brain and endocrine glands' and maintained that extracts of the plant help circulation and skin problems." ~ wikipedia
Final word, well, the herb has always been part of our local salad condiment, and even the ayurvedic treatment swears by them to keep the brain perky, the skin beautiful and youthful...So, why don't you start growing them today? ;)
Monday 2 July 2012
My garden is your garden...
It has been almost two months since we moved up north. We may have switched towns, but not our green fingers. I'm happy to say that my mother in law's garden now has some new greeneries, mostly herbs and everyday veggies. In the peace and tranquility of a new less fast-paced town, I have a very enjoyable time in the garden. This time, we purchased some green vegetable seeds and also some local herbs and plant them in the backyard. We're planning to get a goose to play security guard for the house (my hubby's sense of humor can be really funny sometimes). Meanwhile our previous house has been rented to my sister in law. Our old garden has been neglected for nearly two months and I'm happy to have somebody to look after it when my in law moved in. She has finally settled down and I have helped her to trim the tiny garden and everything is at least okay for the time being. How they are going to look like in the future is totally up to her....
Anyhow, yesterday, my hubby cooked a Thai Red Chicken Curry using the herbs that I've planted ...he made used of the thai basil leaves, lemongrass, and chillies...and they were absolutely delicious. I made the spicy sambal belacan and as a salad condiment, I made use of the Ulam Raja Leaves that has grown taller than myself when we were away. What a spendid idea it was to plant them in my backyard! It was totally worth all the effort! And now, my sister in law will have a ready made herb garden for her to use and I hope she will have a great time using them as I have....
Friday 11 May 2012
Vinegar & its use
Recently i tried a few methods of using vinegar for household chores as suggested by many people on the TV and Youtube. Some did work, while some unfortunately did not.....
1) Vinegar for cleaning purposes ~ yes, it helps to make the floor feel & look much cleaner..The trick, just drop some vinegar in your usual cleaning solution, it also works if you prefer to use plain water and vinegar.
2) Vinegar to get rid of weeds ~ well, quite disappointing...i sprayed some on the weeds in my garden and found out they are still around...perhaps it is only effective on certain weeds?
3) Vinegar to get rid of ants & pests ~ well, certainly not ants...it didn't work. full stop. But it works for getting rid of unwanted cat attention on poop spot. My next-door neighbour's cats love to take a dump in my garden. I have tried shooing them away many times, but they would returned and pooped again and again on my lawn. I tried spraying some vinegar on the spot they usually pooped and have finally got rid of their disgusting, if not smug habit.
4) Vinegar for protection against the evil spirit ~ well, there is a hadis on this, I'm told. Anyhow, i simply poured some in a small cup and left them by the kitchen window. Nothing to lose for trying, right? Prevention is better than cure!
Well, there are other suggestions for the use of vinegar, but i haven't tried them all....like :
- get rid of tea/coffee stains in your cup ~ pour vinegar in the cup, leave it for a while, and wash the cup like usual.
- stop cat from scratching furniture ~ spray vinegar on the furniture to stop your cat from scratching it
- get rid of dandruff ~ massage some vinegar on your scalp, rinse, and then wash with regular shampoo.
Well, it is a cheap alternative...whether they work or not, you got to try them yourself!
Wednesday 9 May 2012
home away and moving away...
Been away for over two weeks. Found out that all my herbs on the backyard were doing well, healthy and that makes me happy! Sad news about the front yard.....my kaffir lime tree and my calamansi lime tree have been attacked by caterpillars while i've been away. They have managed to eat all the shoots on both tree, leaving only some pathetic stalks and lots of poop on on the ground. Well, my front lawn seemed to continue to be the 'poop' museum for animals ~cats and caterpillars in particular! Mi-mi, my neighbour's little girl, has been delighted by the sights of ugly caterpillars -the black and green varieties...ughhh! The grasess on the front yard are doing well, despite my not being around to water it twice a day for two weeks...something to be relieved about...I shiver at the thought of having to re-do them again...
The reason that i've been away so much lately is that my husband and I have decided to move back to his hometown. The decision has been sudden, but it is one that we have no regret about, pertaining the important reasons that lie behind it: The most important reason ~ to take care of his mother, and secondly, his hometown has a bigger population and that is ideal for our new business venture. So I guess, I'll have to leave this garden that I've started and begin some new adventures. My mother in law has a 'kampong' feel to her garden, which is just wonderful. I have already bought some seeds to start a vegetable garden on her backyard. I'll post some pictures of my progress. In the mean time, my hubby and I will be busy packing. I am a little sad to leave my little garden, but fret not, I'll be taking some plants with me...like the pink frangipanis,and the some small plants that won't be taking too much space. It's just sad really, and my bird's eye chillies have just started to bloom too...I guess I won't be here to pluck them and make sambal belacan with my first batch of chillies...
The reason that i've been away so much lately is that my husband and I have decided to move back to his hometown. The decision has been sudden, but it is one that we have no regret about, pertaining the important reasons that lie behind it: The most important reason ~ to take care of his mother, and secondly, his hometown has a bigger population and that is ideal for our new business venture. So I guess, I'll have to leave this garden that I've started and begin some new adventures. My mother in law has a 'kampong' feel to her garden, which is just wonderful. I have already bought some seeds to start a vegetable garden on her backyard. I'll post some pictures of my progress. In the mean time, my hubby and I will be busy packing. I am a little sad to leave my little garden, but fret not, I'll be taking some plants with me...like the pink frangipanis,and the some small plants that won't be taking too much space. It's just sad really, and my bird's eye chillies have just started to bloom too...I guess I won't be here to pluck them and make sambal belacan with my first batch of chillies...
Friday 27 April 2012
The easiest local herb to grow on your backyard!
Do you know that some of the local herbs that you
buy in the market are so easy to grow? Why not start now, and save yourself some money? Let me demonstrate how easy they are and perhaps you'd be inspired
to start your own herb garden too! Some of these herbs include the laksa leaves
(daun kesum), the thai basil (daun selasih), the beetlenut leaves (daun
sireh), the mint leaves (daun pudina) and the pepper leaves/Wild Betel (daun kadok).
The Laksa
Leaves (Daun Kesum).
This local herb is most popularly used by Malaysians to cook
asam pedas, and fish laksa. If by any
chance that you have to cook using this leaves, please choose the best,
freshest stalk from your grocer – because you are not only going to use them in
your cooking, but also in your new herb garden! For your cooking, remove the larger leaves and leave a few new/young shoots on the kesum leaves. put the stalks in water for 1/2 hour before planting these stalks in a rich compost. Make sure when you place them on the soil, the stalks are planted in a slanted way, covering at least 6cm of the stalks. Water them twice daily and put them under the shade for a few weeks for the new shoots to grow healthily.
 |
| The laksa leaves |
 |
| Laksa Penang |
 |
| Laksa leaves in a bunch |
 |
| Asam pedas |
The Thai Basil (Daun Selasih)
The Thai Basil or locally known as Daun selasih
is very aromatic, and is commonly used in the Green Thai Curry or could also be
used a salad which compliments the spicy sambal belacan. A quote from the
online source says that,
" they’re rich in Vitamin A
and antioxidants. Of course, they also give fibers which are good for proper
digestion. With a lot of fast food on the loose today, tummy problems like
reflux are common. So keep Thai basil handy around. You just never know when you
need it. This is just in summary. If you want a full list, here’s the kind of
nutrition you get from this antibacterial herb: Vitamins A, B6, B12, C,
D, E, potassium, magnesium, calcium, selenium, zinc iron, niacin,
lycopene, thiamin, riboflavin, beta carotene, plenty of flavanoids (both
vicenin and orientin for cell health) , and folate, among others.”
If you are interested to grow them, do repeat exactly the same steps with the previous laksa leaves. Easy- peasy!
 |
| The Aromatic Thai Basil |
 |
| The purple flower of Thai Basil. The leaves also usually have some purple hue to them. |
The Pepper Leaves/ Wild Betel (Daun Kadok)
The pepper leaves is delicious when eaten as a local salad (kerabu & ulam), or in the Thai appetizer ‘the Miengkam’. This wild herb usually could be found near the drainage, bushes, and in a shady area.
I quote some info about this wonderful and aromatic herb:
Kaduk is one of the most versatile herb yet it is one of the most unappreciated. It propagates prolifically in a shaded and moist environment, and quickly takes over vacant plots of land. As such, it is considered a nuisance sometimes and cleared away as weeds. It can be found in the urban areas as well as the suburbs and kampungs. he leaves of the plant are called daun kaduk, daun being the Malay word for leaf. It is the main ingredient for favourite Peranakan dishes such as perut ikan, steamed otak-otak and nasi ulam. The pungent aroma of daun kaduk makes these dishes unique in taste and smell. Eating dishes cooked with daun kaduk is an acquired taste due to its unusual aroma and slightly bitter taste. Research has discovered that daun kaduk contains high amounts of antioxidant called naringenin which could scavenge free-radicals and is anti-inflammatory. It is also traditionally used for minor ailments such as toothache and constipation. I have used daun kaduk to reduce flatulence many times. http://deliciousmalaysia.com/daun-kaduk-wild-betel-leaf/
How to grow them? They can be grown using a tree cutting (choose ones where there are a few roots showing near the leaves or just pluck them out with roots and all from the ground. They usually grow in abundance and probably the easiest plant to grow on the planet!!! Remember to plant the cuttings in a slanting manner, making sure the root part near the leaves are buried in the compost.
 |
| THe Wild Betel could be found in shady areas in kampongs, and many are freely growing in vacant plot/land |
 |
| Delicious Miengkam, to be eaten with sweet shrimp sauce
The Betel Leaves (Daun Sireh)
The Betel Leaves (Daun Sireh) has a lot of medicinal
benefits & in the Malay culture, it
is especially used in weddings as a condiment in tepak sireh and sireh junjung. The medicinal benefits include:
Weakness
of Nerves
Betel leaves are beneficial in the treatment of nervous pains, nervous
exhaustion and debility. The juice of a few betel leaves, with a teaspoon of
honey, will serve as a good tonic. A teaspoon of this can be taken twice a day.
Headaches
The betel leaf has analgesic and cooling properties. It can be applied with beneficial results over the painful area to relieve intense headache.Sore Throat Local application of the leaves is effective in treating sore throat. The crushed fruit or berry should be mixed with honey and taken to relieve irritating cough.
Wounds
Betel leaves can be used to heal wounds. The juice of a few leaves should be extracted and applied on the wound. Then a betel leaf should be wrapped over and bandaged. The wound will heal up with a single application within 2 days. |
 |
| Betel leave |
 |
| The tepak sireh |
 |
| Sireh Junjung |
The Mint Leaves (Daun Pudina)
There are many varieties of mint leaves. The most common is the peppermint, applemint and the spearmint. They are used as condiments in laksa, as sauce, in drinks and etcetera. They are easy to grow too. All you have to do is when you next go to the market, pick the best bunch of the mint leaves (the freshest, the prettiest bunch). Pluck the bigger leaves for your cooking, leaving a few young leaves and shoots on. Leave the stalks in a jar of water,and wait for the roots to grow. Once you think there are enough white roots on them, plant them in a slanted way in the compost. Put them in a shady area, keep the soil moist and wait for them to grow healthily.
 |
| mint leaves |
So, start gardening guys! They are not difficult, save your wallet and they provide some colours to your backyard!
Friday 6 April 2012
How to Grow A Frangipani Tree
The Frangipani tree or pokok bunga kemboja is just so beautiful, and smells great too. The flowers come in many varieties ~white, pink, red, and yellow.

A sample picture of Pink Frangipani flower

HOW TO GROW THEM?
1. Growing a frangipani tree can be done by using mature seeds or by using the branch cuttings.
2. BY SEEDS:
- You need to place the seeds in sand media to germinate. After it has produced 5-7 leaves, the plant can be transfer to it's individual pot or any designated area on your lawn.
- However, it has been said that using the seed method will take the tree a longer time to grow, and it is best to use the tree cutting method, which is faster.
- Also, the purity & quality of the tree is not guaranteed because of possible cross pollination during the pollination process.
3. BY TREE CUTTINGS:
- Using the tree cutting method is pretty easy. You need to prepare ~ the tree cutting, rooting hormon powder & media palnting mix (your soil ~3:2:1 or just use peatmoss...easy peasy!)
- What to do? First, identify the type of frangipani tree that took your fancy ~ the pink ones, the white ones etc. Then identify the branch(es) that you want (between 30-40cm or 1 m long). Choose the ones that have a few buds on it.
- Cut/trim the bottom of the tree cutting properly, and leave the stalk to dry between 4-5 days. The tree will normally produce a white rubber when it bleeds.
- Take one dry stalk, dip the bottom of the stalk in 3-4cm of water, and then dip the wet tip liberally into the rooting hormone powder. Make sure the bottom of the stalk are thoroughly covered with the hormone powder.
- Plant the prepared stalk in the media planting soil and they will continue to produce roots and leaves.
Well, the frangipani tree is a great addition to any space ~ not only in the garden, but they could bring some elegance on your porch, too. It will take them about a year before they could grow flowers, but I promise you it will be totally worth it....;)
Tuesday 27 March 2012
Gardening: Backbreaking, but totally worth it.
This is how my adventure begins.....
January 2012 - My hubby, Anaz & I had finally managed to half-moved (I said half because most of our household appliances and furniture are still at my sister-in-law's house) into our brand new home. It's just a plain, ordinary terrace-house, but at least it's ours! The house's small front lawn was a jungle of weeds with the most surprising treasures. I found kid's slippers, sneakers, a pair of tweezers (what the F?), mineral bottle, plastic plate, security padlock, and many2 other crazy items when I pulled the weeds out. Anaz found at least 10 pieces of colourful plastic rulers when he cleared the back of the house. Amazing!!
Pulling out the weeds was back breaking, not to mention the grass planting which I did bit by bit and finally had them finished by end of February. I figured I could cut corners if I do it myself and I did!! We only spent like RM80.00 by doing it the cheap-skin way, which would normally cost RM500-RM600 if we hire the nursery people. But of course, the grass will take a hell-lot of its own time to fully grow and cover the whole yard.
In the mean time, I have been saving seeds and what not for future planting. I have already sown some of the seeds and the small area behind my kitchen has now a small population of ulam raja , pucuk ubi, chilli padi, ginger, turmeric, papaya, pandan, and serai. I am now trying to grow some honeydew seeds, pomegranates, chinese turnip (sengkuang), henna, thai basil (selasih), mint and even potatoes! I must take some pictures someday and show how they have grown!
What amazes me the most from all this experiences is that I manage to finally grow something and it didn't die! For years I had occasionally tried to dabble in gardening from pokok sireh, to carrots and flowers...but they never seemed to be able to survive! I had actually believed that I do not have the green fingers (tangan panas kata orang). Well, I pray that this time luck will be on my side and the things that I have planted will continue to grow and keep on growing healthily.
Subscribe to:
Posts (Atom)